What is a camera?
From the latin camera, meaning a vault or vaulted room. This also refers to the camera obscura, in which a dark room has a small opening or aperture that lets in light, which projects a view of the exterior of the room.
Both analog and digital cameras have two main parts: the body, and the lens. Lenses can be interchanged depending on if you want a zoom or fixed lens (meaning you would have to move closer or further away from the subject).
There are several settings for cameras, ranging from fully automatic to manual (meaning that you control each individual setting). They control a lot of functions, but there are three main settings:
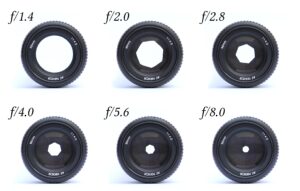
Aperture
The opening in the lens through which light passes. The lower the number (f stop), the wider the opening, and the more light can enter the camera. Aperture also controls the depth of field, meaning how much of the image is in focus. Lower apertures will give you a shallower depth of field (good for portraits and detail shots) whereas a higher depth of field is good for landscapes or spaces where you want more detail.
Shutter Speed
The speed at which the shutter blades open and close to allow light into the camera. Each number represents a fraction.
ex: 60 is 1/60th of a second. 1 is 1 (one) second. B is bulb, which allows the shutter to remain open as long as you hold down the button. T is time, which will keep the shutter open after the first button press and not close until you press the button again. Some people uses slower apertures as well as B and T for night photography!
ISO
The sensitivity of the camera to light. Different films will have sensitivity levels, but digital sensors can adjust to various degrees. The higher the ISO, the more grain or noise you will see in an image. Always try to adjust the aperture and shutter speed before changing the ISO, otherwise your images can come out grainy.
These three settings are essential for having a well-exposed photograph, meaning that it is not too dark and not too bright. The better an image you can get in-camera, the less editing you have to do on the computer. You can adjust these settings through several modes!
Camera Modes
Auto – Automatic, the camera controls all functions
A/Av – Aperture priority, user sets the aperture and the camera adjusts the other settings.
S/Tv – Shutter Priority, user sets the shutter speed and the camera adjusts the other settings.
M – Manual, the user controls each setting.
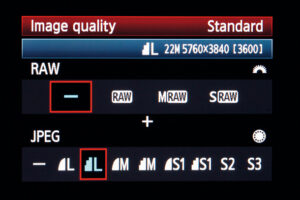
File Types & Image Quality
There are two types of files your camera can generate, RAW and JPEG. RAW will give you the most amount of data, which is good for editing, publishing, and printing high-quality images. JPEGs are good for virtual formats like social media and websites.
You can always convert a RAW file into a smaller size like a JPEG, but you can’t gain additional quality by making a JPEG bigger.
If you don’t have access to photo-editing software like Lightroom or Photoshop you can set your camera to export both RAW and JPEG files, that way you have images you can edit through other apps.
Using the Camera
The advantage of digital photography is being able to view your images as you take them, rather than waiting to develop film. This is a good way to review images and see if you need to change the settings.
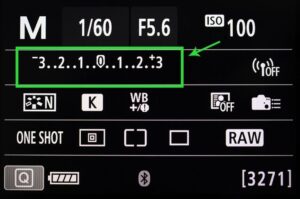
You should still pay attention to your light meter, which you will see at the bottom of your viewfinder or on the screen menu. If the dot is leaning towards the (+) then your image will be too bright, and likewise your image will be too dark if it is closer to the (-). You want the dot to be in the middle of the meter.
Uploading and Editing Images
1. Turn off the camera and remove the SD card. Plug it into the computer or SD reader. Transfer files to a folder on the computer or an external hard drive (preferably both).
2. Open Adobe Camera RAW, this will work in conjunction with Photoshop.*
3. Use the levels to adjust for contrast, sharpness, and overall exposure. You can also adjust color and temperature as necessary, but the white balance on the camera should help with that process.
4. Export files as JPEG (good for virtual viewing), PNG (a higher quality virtual image), or TIFF (good for printing). Use sRBG color-space for virtual images, Adobe RGB for print.
*If you do not have access to Adobe software it is best to set your camera to export both RAW and JPEG images. That way you can have both the high-quality image as well as a smaller file you can edit with cellular apps, which will support images for social media, various devices like tablets, and small prints. GIMP, Darktable, and Canva are free image editing softwares. Darktable has the capacity to edit RAW images!