How Do I Find Out If This Image Is Usable?
When scanning or downloading an image, the most important measurement is the amount of megabytes the image has – all other measurements (dpi, length and width) can be adjusted to give you the same amount of detail.
You can see how many megabytes an image has by doing the following:
- For PC: Right click on the icon for the image, and select Properties.
- For Mac: Hold the Control button and click the icon for the image, select Get Info.
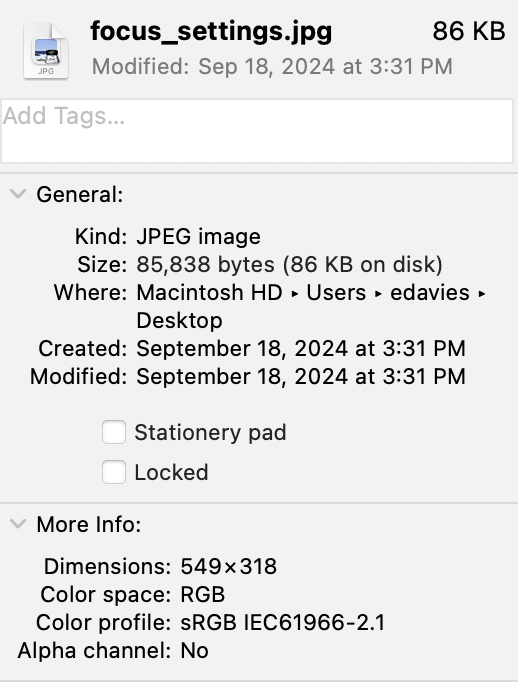
The properties of this image show that it is 86 KB, this is too small for both projection and printing.
If you click the More Info drop-down, you can see the pixel dimensions of the image. For a JPG image, the longest side should be at least 1200 pixels.
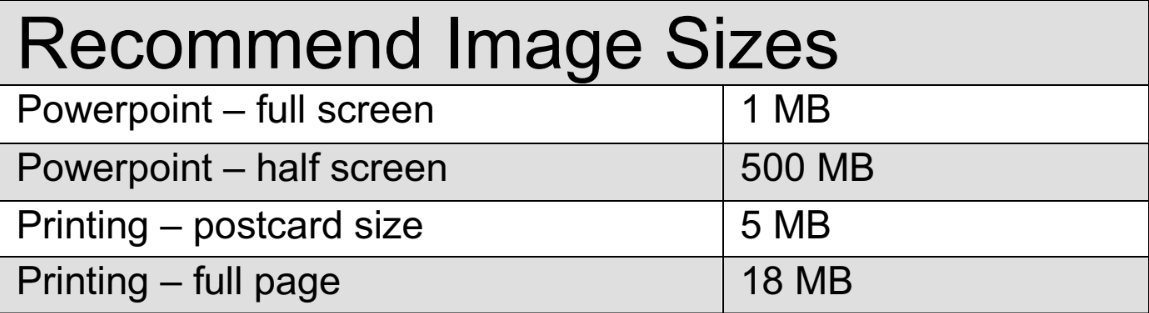
Recommended Sizes
In a PowerPoint presentation, the image memory size should be between 1-2 MB for an image to fill the slide. If the image only needs to fill half the slide you could use an image as small as 500 KB. Anything smaller will not project well.
JPEGs are compressed, so their true memory size may be larger than shown. To check, open the image in Photoshop and look at image properties. The longest side (length or width) should be be between 1000-1400 pixels.
To print the image, the image should be about 5 MB for a postcard-sized image and 18 MB for a full page image. Smaller images will print, but may lack detail or be pixelated.
How do I scan for PowerPoint or Printing?
Scan High, Resize Low
Because memory matters, it is important that you do your initial scan at a large size and resize down to fit the exact size you need. Never scan an image small and try to make it bigger. Scan most materials at either 300 or 600 PPI resolution. If you’re scanning something very small, like a slide or film trip, you may want to multiply those numbers to 1200 or 2400 PPI.
Scanning for Digital Projectors
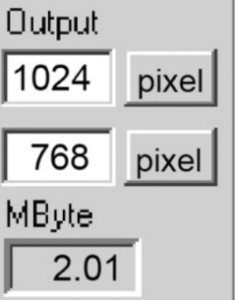
Images for the digital projectors and monitors should be between 1024 to 1280 pixels on the long side.
PowerPoint will always automatically reformat your image to a 1024 x 768 slide output for the standard format or 1280 x 720 for widescreen, regardless of the size of the image you’ve uploaded. Resizing the images before adding them to PowerPoint can be helpful because it reduces the overall size of the presentation file (there’s no point in uploading a 3000-pixel file if PowerPoint is just going to project it at 1024).
However, images under 1024 will always look pixelated. Scanning an image with these measurements will give you an image about 1-2 MB in size (the exception is black-and-white images, which always have less MB than color images).
Save the image as a JPG. This is a standard file format for projection and the web.
Scanning for Printing or Archiving
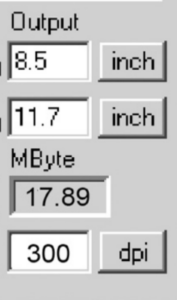
When printing, you still need to pay attention to DPI. But instead of pixel size, you should look at the length and width of the image in inches.
Why? A monitor will measure an image in pixels, but a printer measures in inches. For a standard postcard, you will want the image to be about 4 x 6 inches at 300 dpi. This will be about a 5 MB image.
When saving your print-ready image, be sure to save it as a TIFF. This file format saves your image at the highest quality and is a standard for printing and archiving.